

Pirate Living Room Page Menu: Main Art Lighting Entertainment Center Shelves Pirate Models
Pirate Living Room: Main Page
My living room was one of those rooms in my Themed House that I was pretty sure of from the beginning: I wanted it to have a pirate theme. My interest in pirates go back a long way. I became interested in them when the MPC's line of Disney's Pirates of the Caribbean skeleton models came out in the early 70s. I am currently (allegedly) repainting and repairing models of each of these three kits for use in a special project for this room. From there, a continuing interest in the topic developed, which has waxed and waned over the years, but has basically always been somewhere in my head. I've acquired dozens of books on the topic and have even been a long-standing member of the thriving piracy forum world.
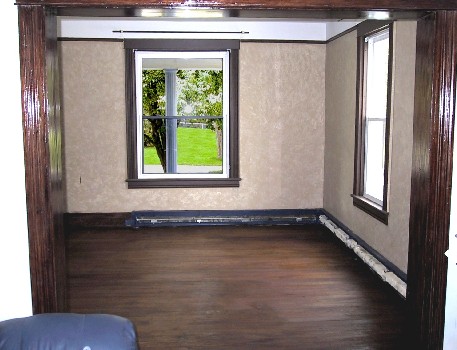
Most of the floors in my house are yellow pine. When they threw (up) that lovely chartreuse carpeting on the floors, they nailed all the floorboards down, leaving loads of exposed nail heads. Not really wanting to put down new flooring, I decided to take the easy route and hand strip, sand and stain the floors here and in the master bedroom. (Ha ha ha ha ha! Boy, that was a good one! Anyone who thinks it's actually easy to hand strip and sand a floor has obviously never tried it. That part of the process took weeks.) The end effect was quite nice as you see below, however. I even thought the exposed nail heads and hammer pounded yellow pine added to the piratey effect.
|
|
Above left you see a mid-stage photo at left. I didn't have the foresight to take any photos of the living room as I found it - with yellowing white paint with the moldings painted to match, the barf tan heaters and the lovely bright greenish carpeting. So you'll have to imagine that.
I hand stripped the floors and door moldings. (Those moldings had at least 5 or six layers of paint on them. These included a light orange and a mint green.) I had planned to had strip the windows, but I learned my lesson on the door moldings. So I just painted the window moldings a dark brown and added yet another layer of paint to them. Still, the stripped, varnished and finished door moldings look pretty nice as you can see.
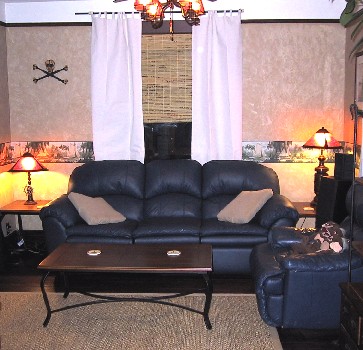
The photo above right shows the finished room from a similar
viewpoint. Early on, I decided that a pirate would probably have
chosen leather furniture. So I spent quite a bit of time hunting for a
comfortable leather couch and a matching reclining-rocker La-Z-Boy style
chair. I had originally planned to paint the bottom half of the room sand
color and the top dark blue to give a sort of beach-looking-out-at-the-ocean
feeling to it. My pal at Sherwin-Williams convinced me to try sponging light
tan over dark which gave the walls a cave like feel. She also suggested
putting the dark color on the bottom, but, upon seeing the tan effect, I
abandoned the blue on the walls idea entirely and settled for painting the
heater register the dark blue. This is also why I chose to make my leather
furniture blue. Well, that and I have always thought blue leather looked
sort of neat. (There's no accounting for tastes.) The curtains are actually
 made of canvas (which the woman I hired to sew them cursed me long into the
night for choosing) and the roman shades are bamboo flavored or something
like that. The lamps have a history of their own and you can click
here if you want to learn
more about them.
made of canvas (which the woman I hired to sew them cursed me long into the
night for choosing) and the roman shades are bamboo flavored or something
like that. The lamps have a history of their own and you can click
here if you want to learn
more about them.
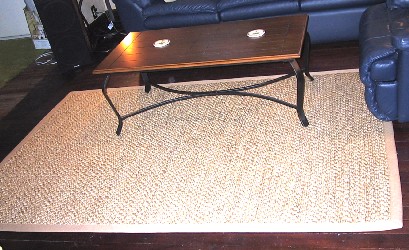
The end and center table all have a black iron and plank feel to them, which I hope brings up the idea of being on a ship. The coasters have a palm tree theme going on. The rug is one of those rope tied things with regular rope intertwined with a darker colored strand. I was surprised at how soft this turned out to be! It is from the Ernest Hemingway Collection of area rugs and I think it really brings the room together.
|
|
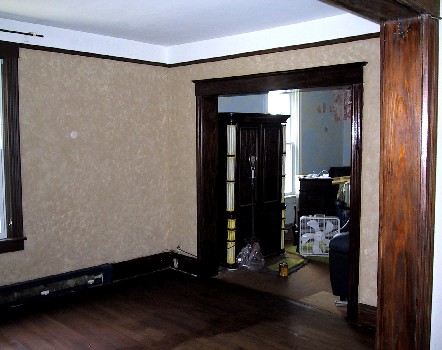
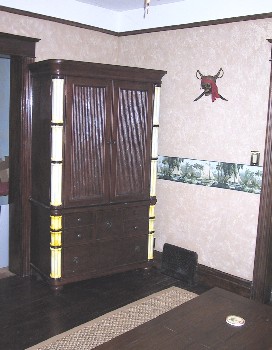
Above left is a view of the other side of the room. Note the beautiful door moldings. Ooh, ah. You can also see the "bone" entertainment center, sitting in the wings, waiting for it's shot at stardom. At right is the Entertainment Center after it was installed into its proper place. This is a view standing in the center of the first picture and looking at the corner you can't see behind the closest door molding. You can read more about the Entertainment Center here. Also visible in this shot and the one below are the wallpaper border and artwork selected for the room. Click here for more on these things.
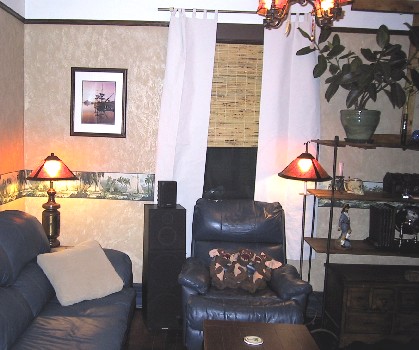 At left is the side wall of the room with the smaller window. This appears
in the partially finished room picture above left on the left side of the
photo (you can just see the edge of the window there). Here you have a
nice view of lamps, recliner and the canvas curtains I mentioned.
At left is the side wall of the room with the smaller window. This appears
in the partially finished room picture above left on the left side of the
photo (you can just see the edge of the window there). Here you have a
nice view of lamps, recliner and the canvas curtains I mentioned.
The shelf (at the right side of this photo) was something I found on Craig's list that really fit the mood of the room. To see the contents of the shelf and read all about various things that are there, feel free to click here.
Notice the picture rail at the top of the room. In the olde days, they used to put a rail near the top of the plaster walled rooms so you could put nails into it and hang pictures from wires down from there. I've found that careful use of wall anchors and certain screws removes the need. (It a pain to refinish.)
Pirate Living Room Page Menu: Main Art Lighting Entertainment Center Shelves Pirate Models
Main Page • Tools & Procedures • Miscellanea • About the Author • Facebook Page
All original content copyright M. Kehoe • 2003-