

Skeleton Garden Menu: Main Skeletons Skeleton Garden Skeleton Flowers Skeleton Tree
The Skeleton Garden Tree
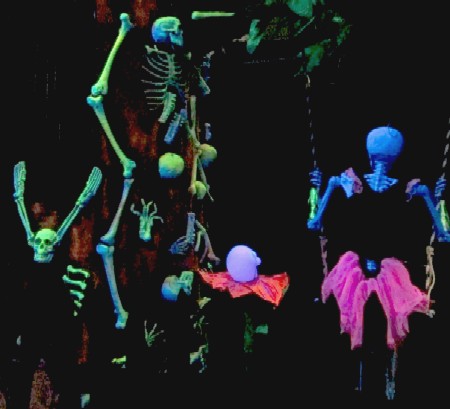
The Skeleton Tree (Left Side) and the Back of a Flower and Skele-Girl on a Swing
The original concept for this room - It's a Skull World - was designed to be outside. It had originally been planned to be done in 2007, but I couldn't figure out how to make the Skull Flowers sing (see this page for more on that). So I did a Skeleton Tree instead, thinking I could put it into the 2008 It's a Skull World room. Except, of course, that never happened. The tree was left with the Jaycees and wound up being destroyed. The skeleton tree had gotten anchored to the room idea in my mind, however. So I had to build a new one.
Tied directly to the tree was an idea for a little girl skeleton on a swing. You can see the back of her in the photo at left. Her story is told in greater detail on the Skeleton Props page. The tree was also to be the hiding place for the haunt worker. With that in mind, I left the upper part of one side open and we put a door in the back so the worker could climb inside the tree and get people as they walked around the tree and the scene with the blue skeleton girl.
The Skeleton Tree Construction
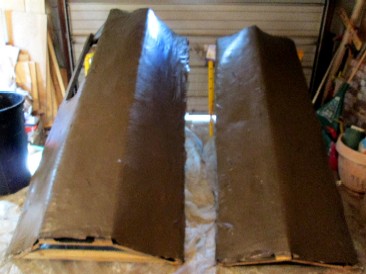
Since I had already made a tree, I knew the basics. The only basic difference in the exterior of the tree was the window for the haunt worker to poke through, which was easy enough. My friend John Samyn (who helped to do the room) pointed out another modification that would be useful - make the tree in two parts so we could actually get it into the building. I had not thought about this for the last tree and he and I ended up removing window just so we could get it inside. So I dutifully measured the width of the smallest door in the building between the outside and my haunt and built this tree in two parts that would easily fit - as seen below right.
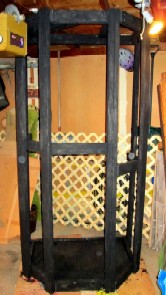
 The Basic Frame |
 Frame With Floor Painted |
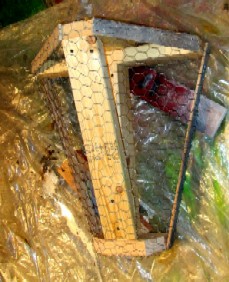
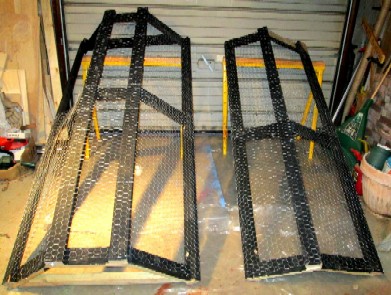 Chicken Wire on the Two Halves of the Tree Frame |
The 'bark' of the skeleton tree was to be paper mache laid over chicken-wire like the last one. Unlike the last one, I decided to put the paper mache on before attaching the bones. This was done partially because I wanted to paint the bones in fluorescent colors before putting them on the tree and the gooey paper mache would have messed the paint up. I decided to paint the tree dark brown - I even went a bought a custom mixed pint of paint to do it. In truth, I could have painted it any color, however. The black light wipes out non-fluorescing colors. (It does not, however, wipe out certain pieces of newsprint which glow like beacons. So it had to be painted.)
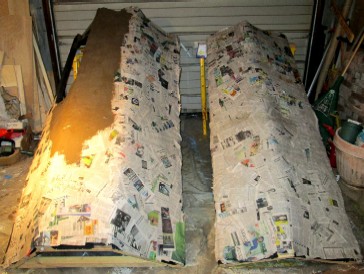 The Paper Mache Skin on the Tree Halves (Plus a Bit of Paint) |
 The Skeleton Tree Halves Painted Brown |
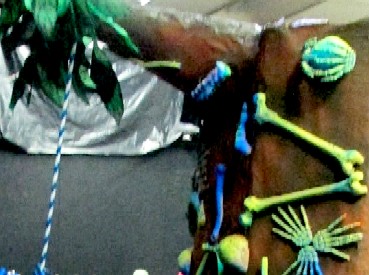
I had bought five bags of bones at the post Halloween sales the year before, which were used to decorate the tree. I first painted them, trying to make them fluorescent yellow on top and fluorescent blue on the bottom to give them a sort of shadowed appearance. I don't know if the shadowing concept came across, but it gave the tree an interesting look. Once dried, I used screws to fasten the bones on the wooden joints (being careful not to have any of them cross the split in the tree when I unbolted the two parts). If there were not wooden joints, I poked pieces of wire through the paper mache skin and twisted it around the chicken wire from the inside.
I like to get creative with the designs to keep things interesting for myself. Some of the designs are just sort of random. Others amused me like the odd little spidery and crab-like things I used the toes to create. Naturally there are a few symbols of significance to me in there.
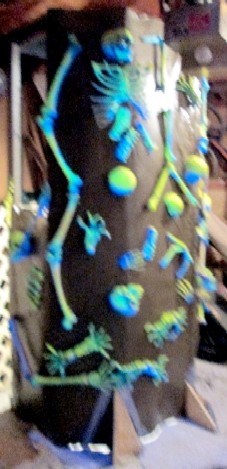 The Left Side of the Tree with Bones |
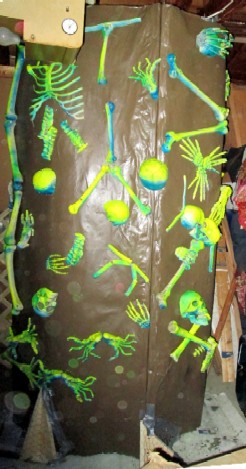 The Center of the Tree with Bones |
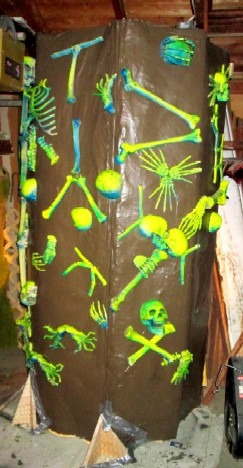 The Right Side of the Tree with Bones |
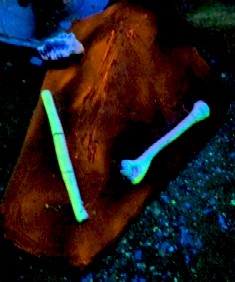
Since the skeleton flowers had gone so well, I turned on the black light expecting great things from this new version of the skeleton tree. Something was missing, however. It looked like a lot of glowing bones suspended on some odd, dark canvas. I needed to get the idea of the tree across somehow. So I tentatively painted a bit of orange around the bones. It looked pretty good, so I got bolder with the orange. I don't know if I ever achieved true "treeness", but this at least put the idea across better.
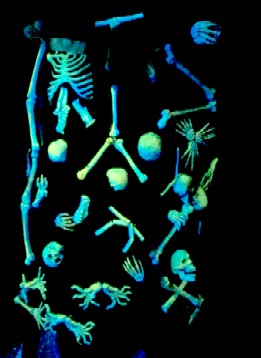 The Black Lit Tree - Bones Only |
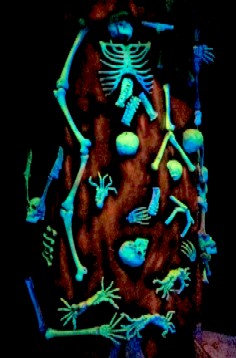 The Black Lit Tree Center with Orange |
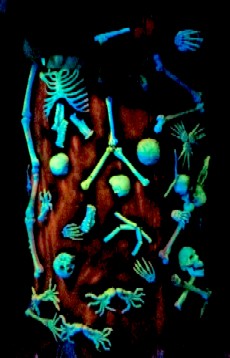 The Black Lit Tree Right with Orange |
The Skeleton Tree Branch Outgrowth
The Painted Skeleton Tree Branch Outgrowth
Like I had with the previous skeleton tree, I added roots to the bottom to give it more of a tree-like presence. You may have noticed these in the photos above. Something else about this tree concerned me, however - there was going to be a branch with a swing on it. We were just going to use a 2x4 that would extend from the tree to the wall opposite and tie the swing ropes to that. I wanted more, however. It seemed to me that this was going cheap on the tree branch, so I decided to built an outgrowth such as you might see on a tree if were made out of 2x4s.
We've already gone through the basic process of doing this with the tree itself, so there's nothing really new to be learned here. I have a nice saw that allows me to cut precise angle (which I didn't have when I made the first skeleton tree), so I was able to get a pretty nice skeleton for the skeleton tree branch outcropping as you see below left. I used 2x4s for the
The Skeleton Tree Branch Outgrowth in Place With Leaves
main part and furring strips for the angled sides that were only there so I could attach the chicken-wire.
I had a few bones left over from the tree, so I painted them and wired them onto the branch outcropping.
I couldn't actually attach this to the tree because 1) I didn't know where the 2x4 was going to be placed and 2) It would have defeated the purpose of making the tree small enough to fit through the door by splitting in half. So I didn't know what it was going to look like until I screwed it to the tree once it was in place. I liked it, but I wanted a bit more. I still had a bunch of the cheap fake plants left, so I sprayed them fluorescent green and attached them to the point where the outgrowth met the 2x4. I think it worked quite well.
 Skeleton Tree Branch Chicken-Wired |
 Skeleton Tree Branch Paper-Mache'd |
 Skeleton Tree Branch Black Light |
Transporting the Skeleton Tree
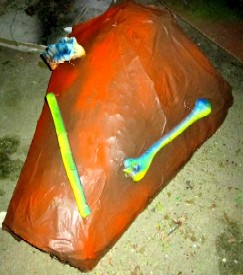
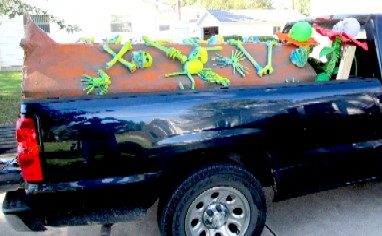
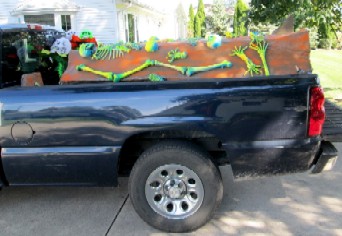
Of course now that I had built this monster of paper mache and foam bones, I had to transport it thirty some miles to the haunted house. I originally thought about building a wooden frame so I could stack the two halves in the bed of the pickup. I was still worried about damaging the bones, however. I was also concerned that the wind might get under the things and lift the smaller half out.
Then it hit me; I could just screw the two halves together and butt it up against the cab! It was the same way I had transported the first tree after all. As an added bonus, I could shove all the other parts of the haunt in under the arch of the tree. That worked quite well, although I turned a few heads along the way.
 Transporting the Skeleton Tree in the Pickup, Right Side |
 Transporting the Skeleton Tree in the Pickup, Left Side |